|
Before proceeding, make sure to read about Web Payment Systems Manager.
Setting Up WorldPay
Once you have registered a WorldPay business account,
enable WorldPay in your control panel:
- Select Merchant Gateways in the Settings menu.
- On the Merchant Configuration page, choose WorldPay from the drop-down menu.
- Click the Edit button to activate it.
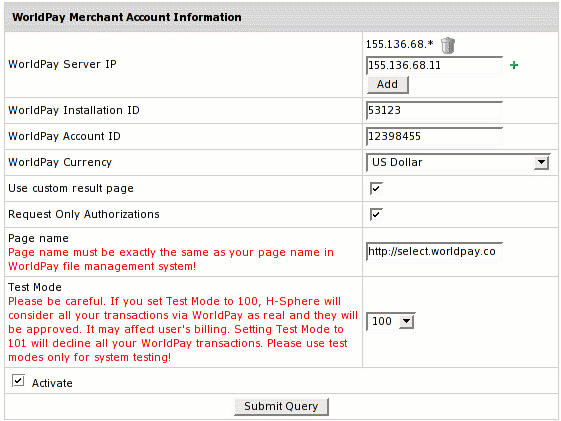
- Enter the required parameters in the WorldPay form:

- WorldPay Server IP where payment notification requests come from.
Payment requests from other IPs will be rejected which helps to avoid fraud.
Note: You can enter IP mask instead of IP, for instance 127.0.0.* or 127.0.*.*
- Installation ID, provided to you by WorldPay system upon registration.
- WorldPay Account ID, provided by WorldPay upon registration.
- WorldPay currency from the drop-down box.
- Check Use Custom Result Page if you want your customers to receive
your custom email payment notifications.
 (HS 3.0 Patch 4 +) Request Only Authorizations: enable AuthMode in WorldPay (HS 3.0 Patch 4 +) Request Only Authorizations: enable AuthMode in WorldPay- Enter the Custom Page name which should be exactly the same as in the WorldPay account.
- Set a Test Mode variable for testing online transactions via WorldPay:
- with variable set to 100, Parallels H-Sphere will consider all your transactions real.
They will be approved that will reflect on user's billing.
- with variable set to 101, Parallels H-Sphere will decline all your WorldPay transactions.
- with variable set to 0, Parallels H-Sphere will perfom real transactions in a live mode.
- Check Activate to enable WorldPay for new signups and existing accounts.
- Click Submit Query. WorldPay now must show as active.
- Set Instant notification URL to receive information about payments made via WorldPay:
- Log into your WorldPay Business account
- In the Installations section, click the Configuration Options icon;
- Enter a callback URL
- Check Callback enabled box.
Callback URL works as follows:
- Customer submits a payment form through WorldPay;
- WorldPay sends notification about payment made to the callback URL you specified.
|