|
Preparation
Contact your hosting service provider to work with files on the host server.
Make sure that the pnpapi.jar file is present in the
/hsphere/local/home/cpanel/java_rt/ directory.
If it's not there:
- Contact Plug'n Pay and obtain the pnpapi.jar file.
- Put the lib file into in the directory ~cpanel/java_rt/.
- Restart Parallels H-Sphere.
Once you have registered with Plug'n Pay:
- Download the certificate file archive
from the Plug'n Pay site
- Unzip the archive into a directory on the Control Panel server, for example,
/hsphere/local/home/cpanel/shiva/pnp-certs/.
This directory and files therein must have cpanel:cpanel permissions
- Later on you specify this directory in the Certificate Dir field in Plug'n Pay configuration form (see below).
Configuration
- Select Plug'n Pay in the Add New Gateway box.
- Click the Add button.
- Fill out the form that appears:
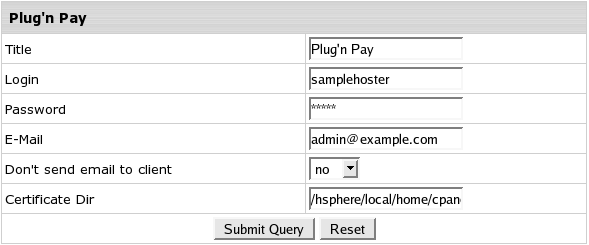
- Title: give a name to this Plug'n Pay connection
- Login: your Plug'n Pay login
- Password: the password which comes with login/username
- E-mail: the email address you provided on signing up with Plug'n Pay
- Send E-mail to Client: check this box to have your customers notified when they are charged. The addresses are taken from their contact info
- Certificate Dir: the directory on the Parallels H-Sphere control panel server where you have put the certificate file
- Click Submit Query
|