|
Before proceeding, make sure to read about Web Payment Systems Manager.
In order to configure ChronoPay, download and install the latest
ChronoPay .hsp package.
Setting Up ChronoPay
Once you have registered a ChronoPay business account,
enable ChronoPay in your control panel:
- Select Merchant Gateways in the Settings->Payment Settings menu.
- On the Merchant Configuration page, choose ChronoPay from the drop-down menu.
- Click the Edit button to activate it.
- Enter the required parameters in the ChronoPay form:
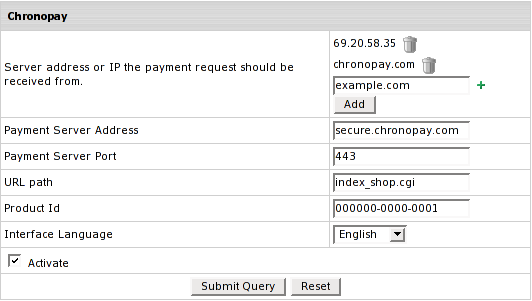
- Server address or IP the payment request should be received from: set the IP
where payment notification requests come from.
Payment requests from other IPs will be rejected which helps to avoid fraud.
Note: You can enter IP mask instead of IP, for instance 127.0.0.* or 127.0.*.*. Also you can specify the server name.
- Payment Server Address you will be redirected to for payment operations
- Payment Server Port: enter the port to be used
- URL path - the path to the server side handler file. This can be a script or a binary file that is launched with an http request.
- Product ID: the ID provided to you by ChronoPay system upon registration.
- Interface Language: choose the language from the drop-down box
- Check Activate to enable ChronoPay for new signups and existing accounts.
- Click Submit Query. ChronoPay now must show as active.
|