|
Before proceeding, make sure to read about Web Payment Systems Manager.
Once you have registered a 2CheckOut account,
enable 2CheckOut payments in the control panel:
- Select Merchant Gateways in the Settings menu.
- On the Merchant Configuration page, choose 2CheckOut from the drop-down menu.
- Click the Edit button to activate it.
- Enter the required parameters in the 2CheckOut form:
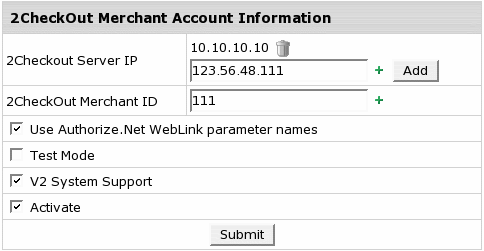
 (HS 2.5 RC2 and up) 2CheckOut Servers IP where payment notification
requests come from. Payment requests from other IPs will be rejected which helps to avoid fraud. (HS 2.5 RC2 and up) 2CheckOut Servers IP where payment notification
requests come from. Payment requests from other IPs will be rejected which helps to avoid fraud.
Note: You can enter IP mask instead of IP, for instance 127.0.0.* or 127.0.*.*- 2CheckOut Merchant ID: your ID provided to you by 2CheckOut.
- Check the box if you want to Use Authorize.Net WebLink parameter names.
- With Test Mode enabled you can test your online 2CheckOut transactions.
- If V2 System Support (v.2.4.2 Patch 1 and up) is checked, the system will apply
a new http routine used with the V2 2Checkout system.
Note: 2CheckOut is transferring all customers to V2 System. Therefore we recommend enabling this option.
- Activate: check it if you want to enable 2CheckOut for new signups and existing accounts.
- Click Submit. 2CheckOut now must show as active.
|